


Glutinous Rice Cake: Mango and Peanuts

Living in a small mountain village and wanting to eat glutinous rice cakes, there is nowhere to buy them. After that, I can only search the information online and learn how to make them! At first, I made glutinous rice cakes. Later, I wanted to try the peanut flavor, so I gave it a small makeover! 😄
Material Preparation: p>
Peanut Stuffing:
First talk about peanuts For the filling, I used roasted peanuts and sesame seeds. Crush the peanuts first. You can use a food processor, but because I like to bite peanuts, I crush them manually and make them bigger. I want a bite-like texture!
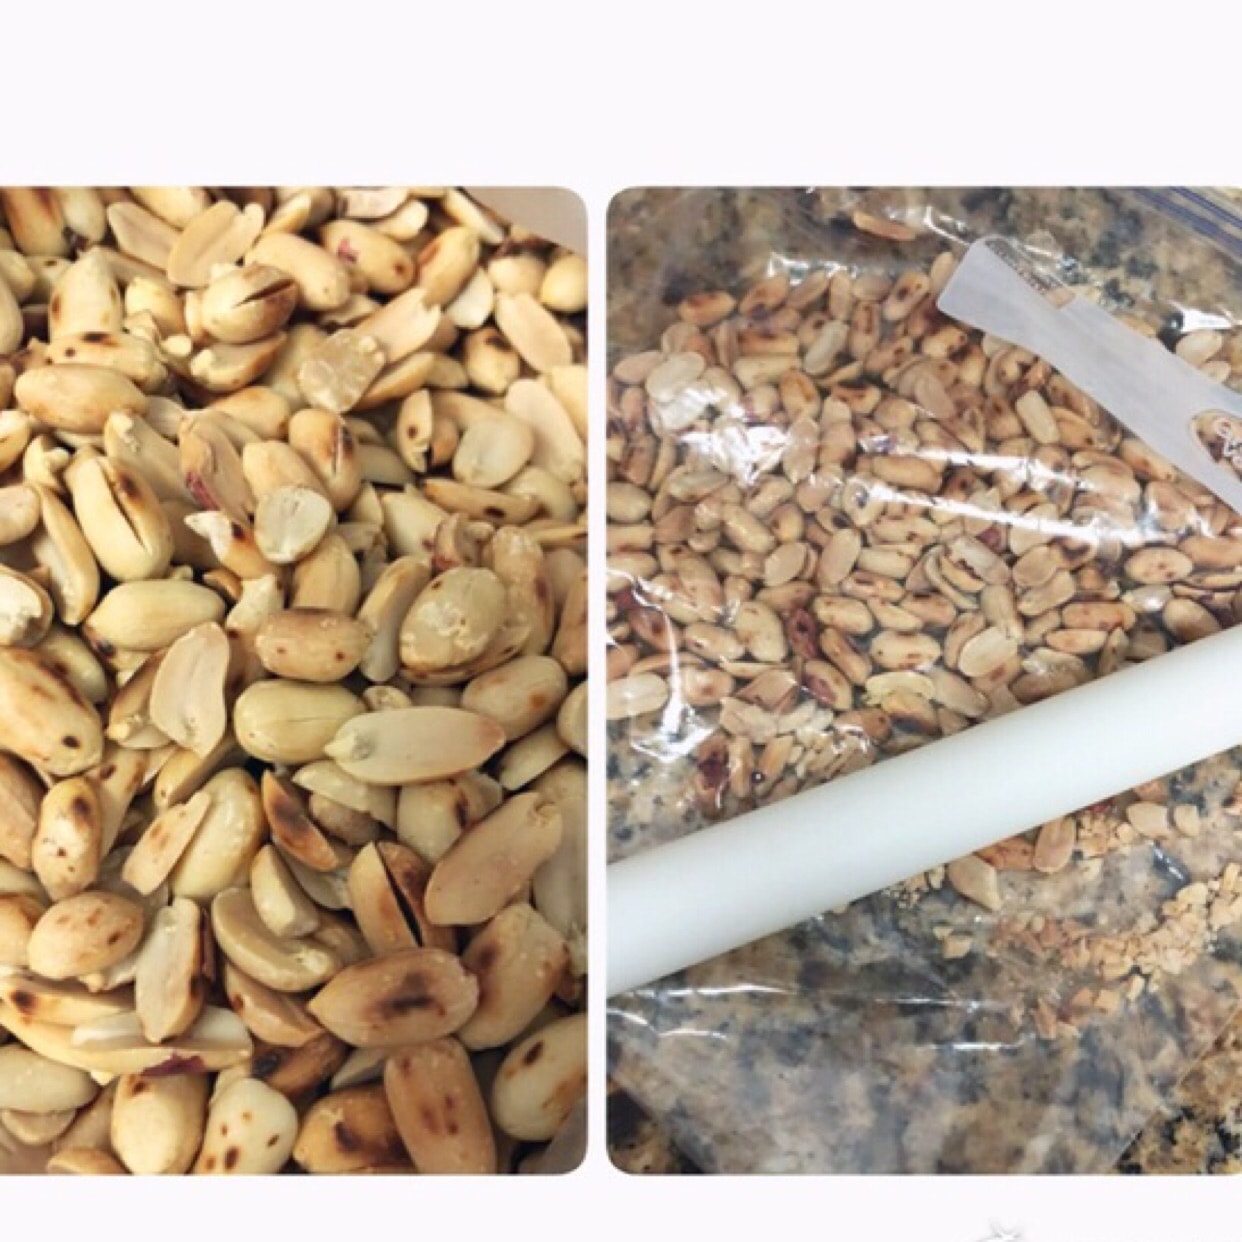
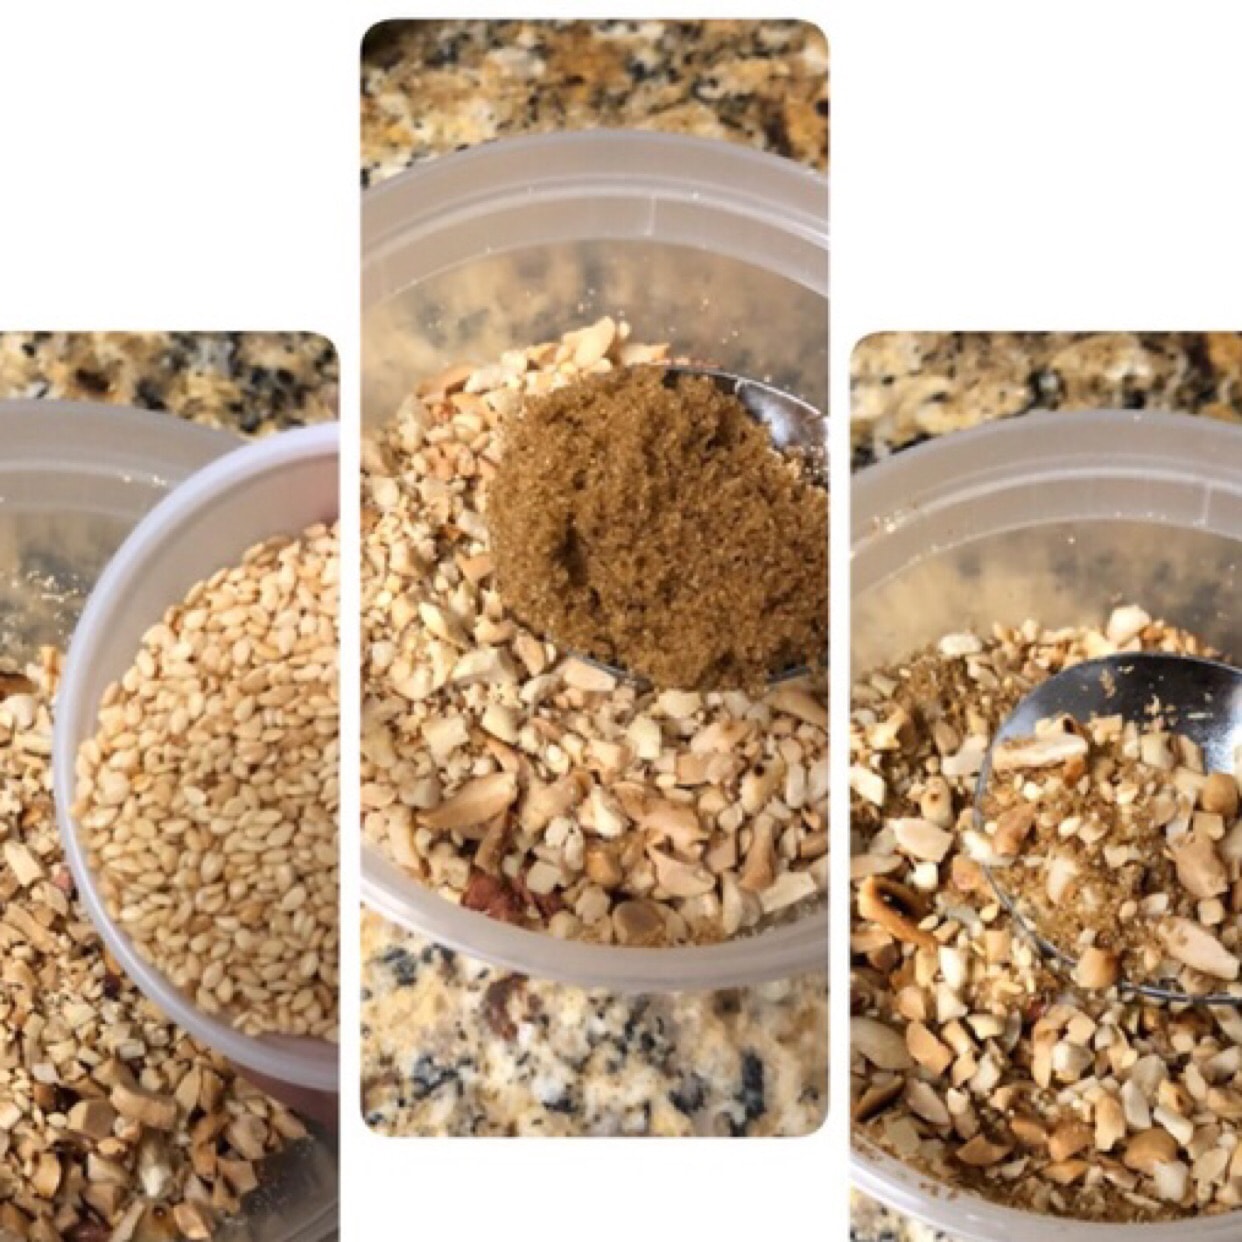
Cracked Peanuts After that, add sesame seeds directly. Adding some sesame seeds will make it more fragrant. As for the amount of brown sugar, you can control it yourself. I put it here6spoon, after stirring, try the taste! If it is not enough, you can add brown sugar. Because I eat it myself, I add brown sugar to be healthier. For those of you who don’t like brown sugar, you can directly use white sugar instead!
⚠️I didn't write the amount of peanut filling here because I always make a little more, and I will have it the next time I make it. The material is there! ⚠️
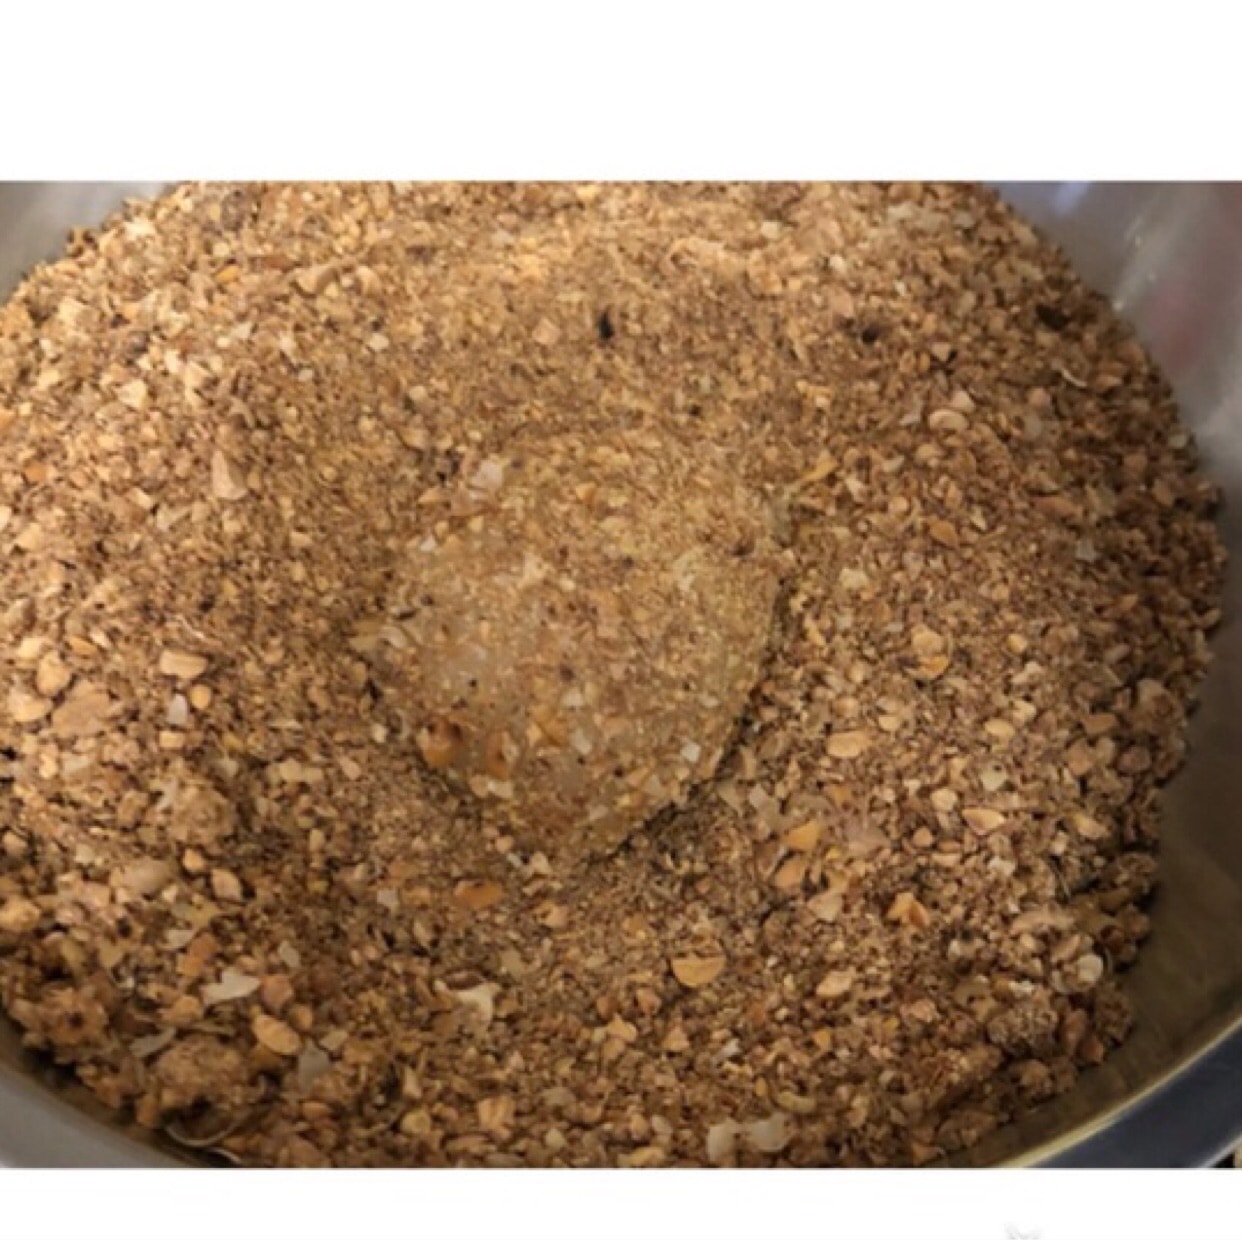
As for the layer of peanut filling, just grind the fried peanuts and soybeans into powder, stir well and add sugar!
Glutinous Rice Cake:< /p>
Milk100G
Coconut Milk100G
Glutinous rice flour120G
Corn Starch30G
Unsalted butter15G
Sugar50G

⚠️ Melt butter in warm water⚠️
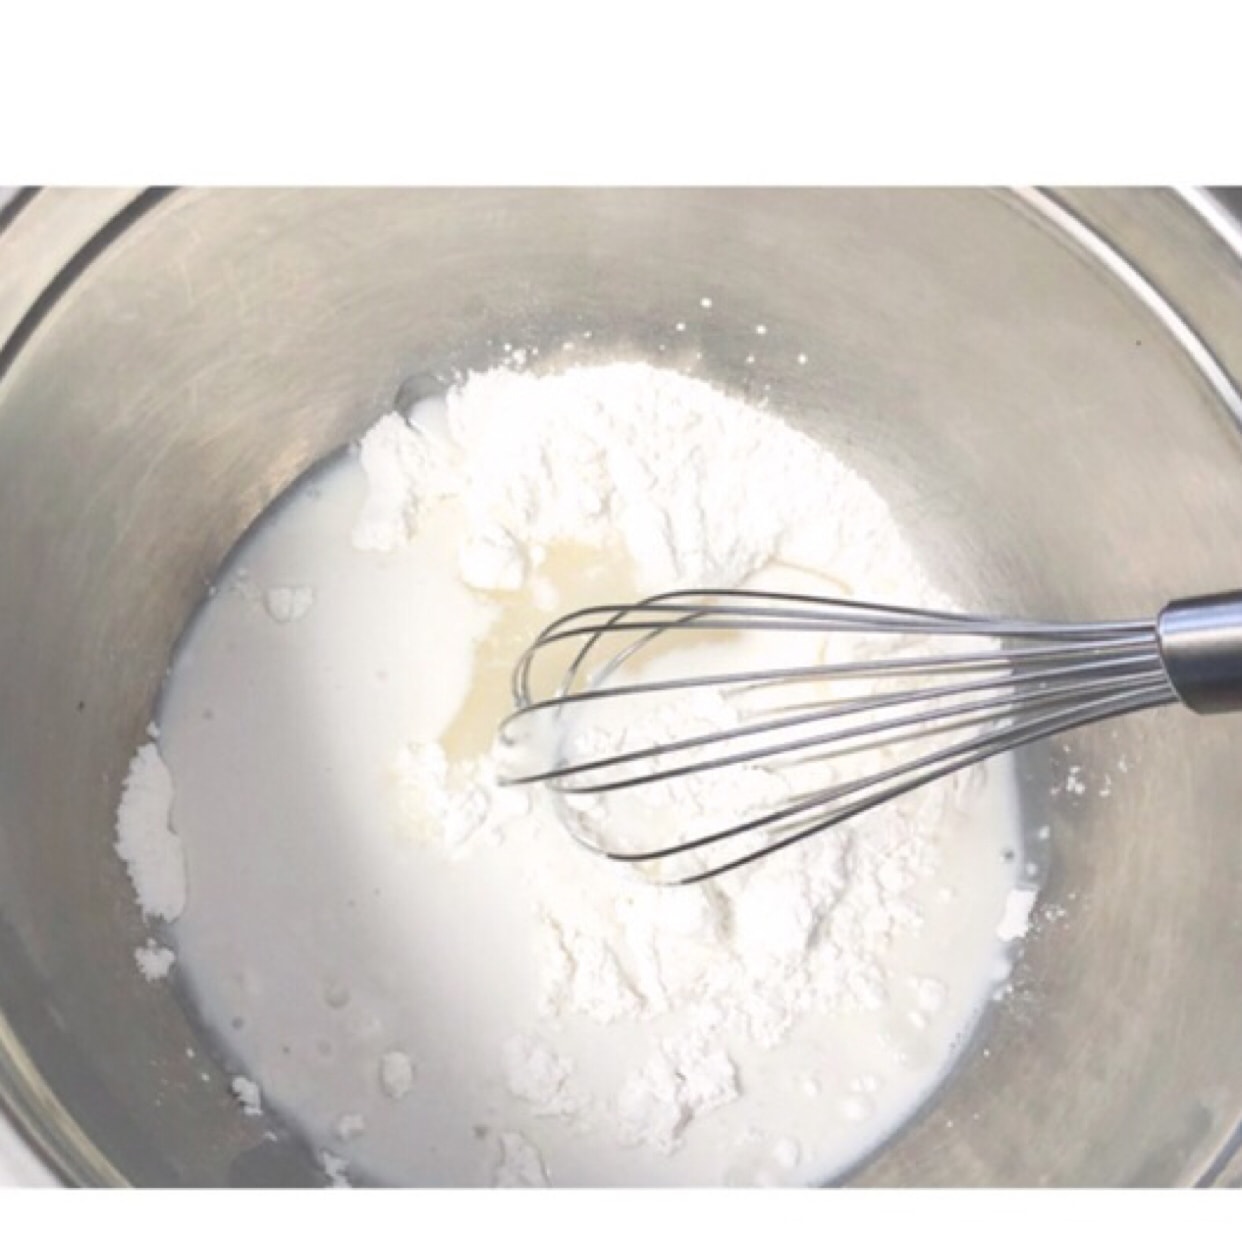
Pour all the ingredients into a bowl except the butter! Beat with a hand mixer until smooth!
Then add the butter and mix well!

Pour into a plate, cover with plastic wrap and prepare to steam on medium heat15 minute!

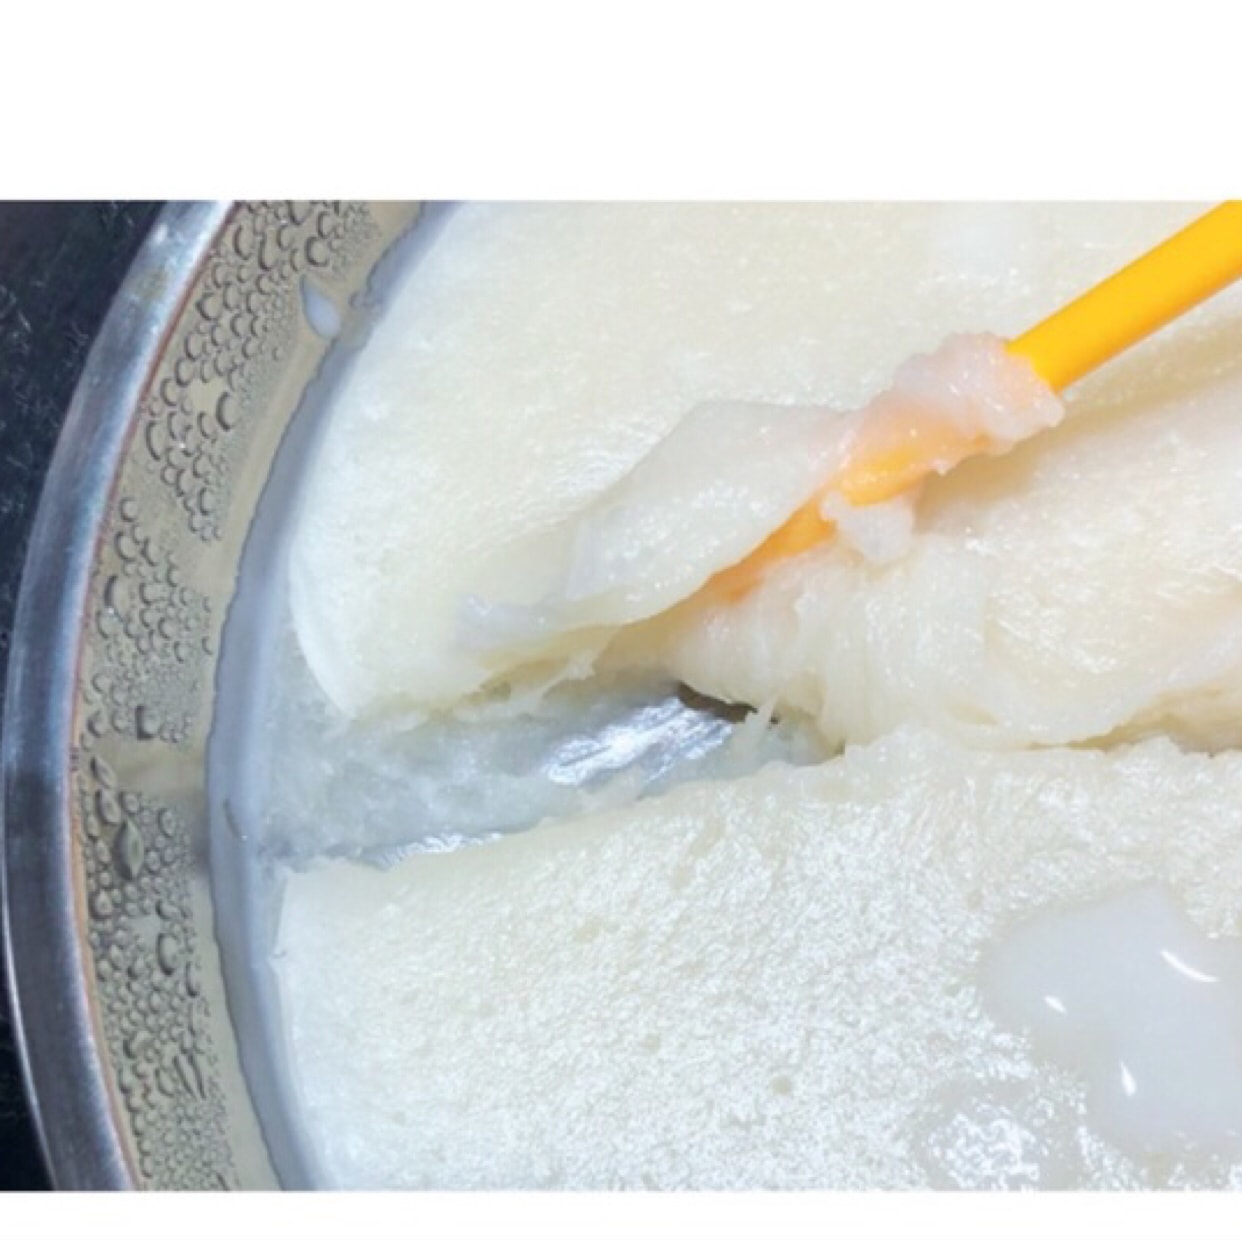
After steaming, take a chopstick to open the batter, if there is no white liquid in it, it means your batter is ready! After removing the batter from the plate, put it into a clean bowl, cover with plastic wrap and let cool at room temperature! The skin will be hardened by the wind if it is not covered with plastic wrap!
Dice mangoes, I will cut them bigger! This will give you the taste and taste of mango when you bite into it!

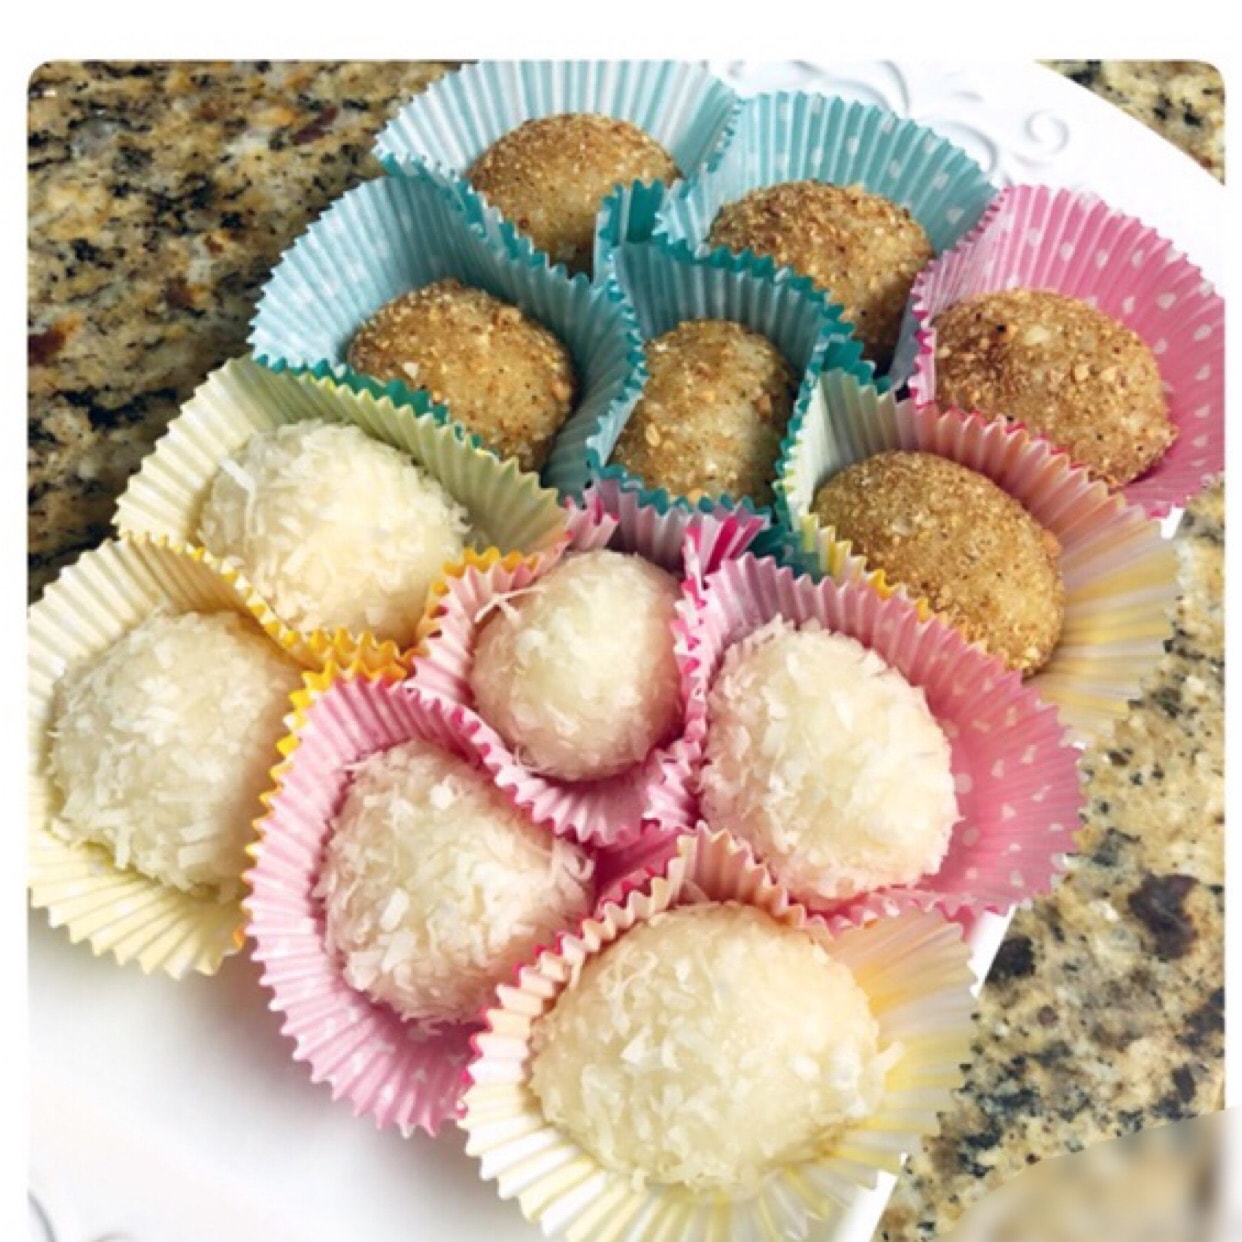
Here is the mango flavored one, I prepared the coconut wrapped in the skin, and the peanut st0 one I prepared the peanut flavored one!

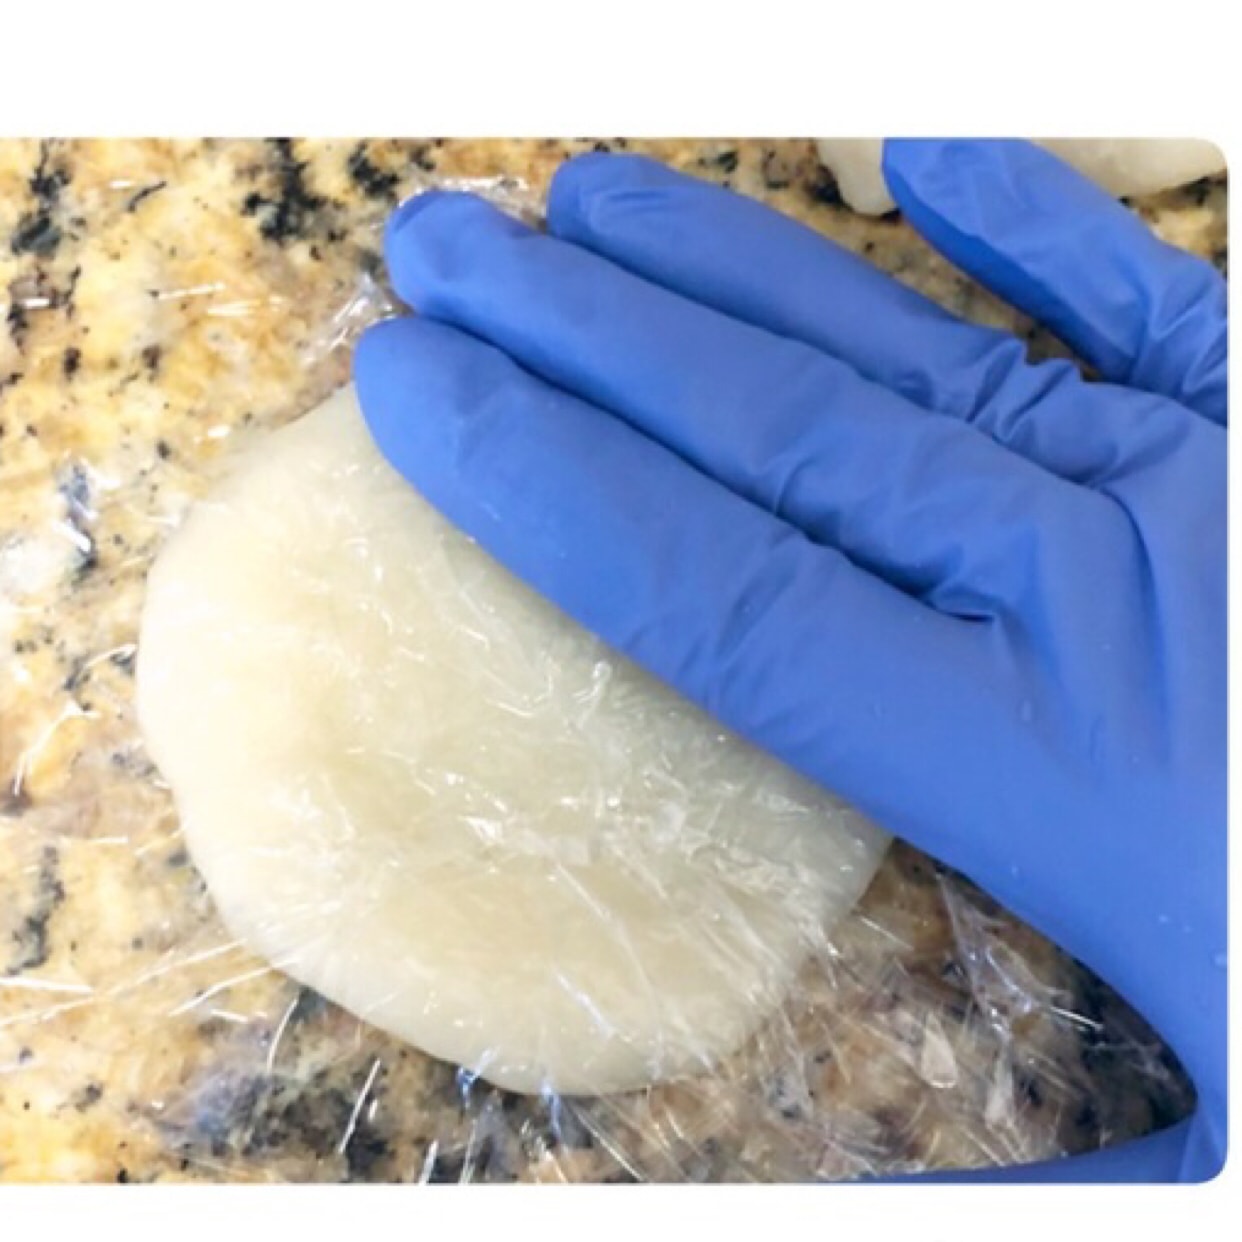
You can start doing it with a little warmth, remember to wear gloves, or your hands will stick to it!
Knead the batter a little, if you are afraid of sticking gloves, you can wrap it in plastic wrap, so that it will not stick so badly!
After kneading, I just rub it out without weighing it! I usually grab the size by myself. If you want to make it more accurate, you can weigh the total weight first, then count the number of pieces, and wrap the dough with plastic wrap, for fear of drying!

Wrap the dough with a layer of plastic wrap, and then press it flat, so that it is not easy to stick to gloves, and it is convenient!
Put the mango on it and put it away, I wanted to show you how I put it away! But the hands are really empty! I probably just pinch the four corners first and then slowly pinch it from the corners!

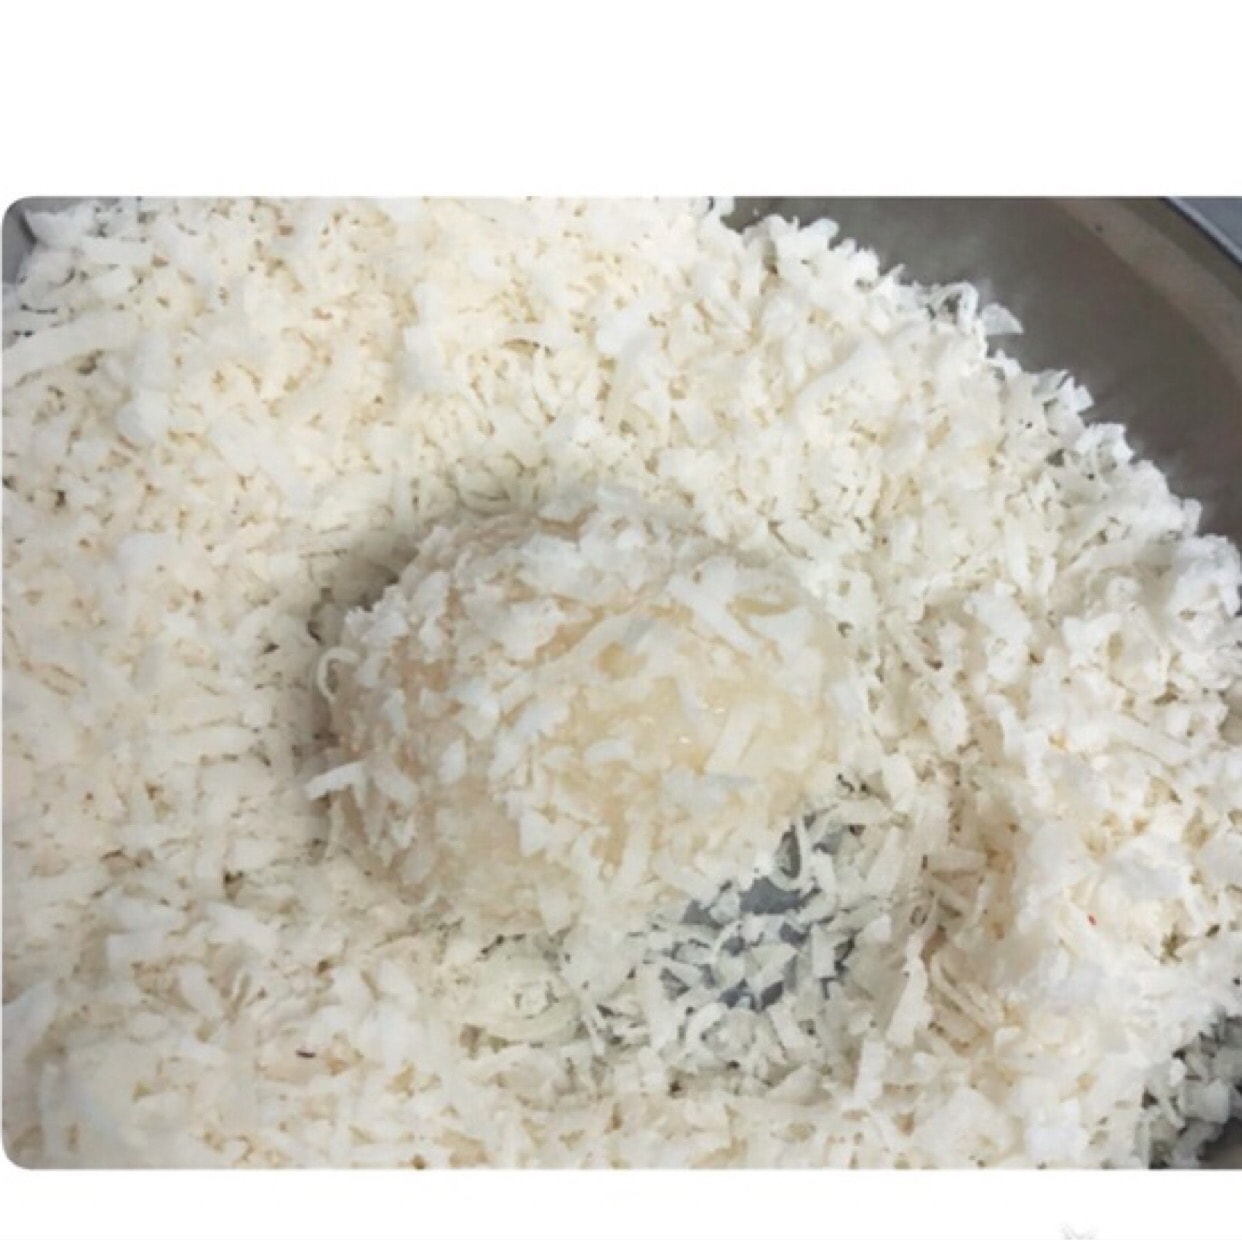
Toss in the shredded coconut, roll and roll, after wrapping the shredded coconut, I will hold it in the palm of my hand and press it to make sure that the shredded coconut will not fall off a bit!
The same is true for peanuts, but it may be a little harder to wrap the peanuts, because the peanut filling will accidentally run out when lifted! So the way I wrap the peanuts is similar to dumplings, fold them in half directly, pinch them from the corners like a dumpling shape, seal all the mouths and roll them into a round shape!

Wrap the peanut powder and the peanut glutinous rice cake is ready👍
I couldn't eat mangoes for special reasons, so I bought peanuts on a whim, and I think peanuts are delicious too, because fried peanuts are particularly fragrant! There are those who like mangoes and those who like peanuts, everyone has a share! 😄


The End
Here I made a total of 12! If you want to make more, just add this amount directly!
Cut the remaining mango cubes, don't waste them, I will use them directly to make mango sago, delicious😋Delicious!
 Show Original

糯米糍:芒果和花生

住在小山村想吃个糯米糍都没地方买,之后只能上网自己查资料学着做起来了!刚开始做的是糯米糍,后来想试试花生口味,就给小小的改造了!😄
材料准备:
花生馅:
先来说说说的花生馅,我用了炒好的花生和芝麻,先把花生弄碎,你可以用料理机,但是因为我喜欢咬花生,所以我手动弄碎,弄的大点,想要有咬的口感!

花生弄碎之后,直接加入芝麻,加点芝麻会更香一点,至于红糖的量,你稍微自己控制一下,我这里放了6勺,搅拌好之后试下味道!不够可以再加红糖,因为自己吃所以我加的是红糖更健康一点,不喜欢红糖的你们,可以直接用白砂糖来代替!

⚠️这里我没有写花生馅的量是因为我每次都会多做一点,下次做的时候就都有材料在那了!⚠️
至于花生馅外面包的这层,就是用炒好的花生和炒好的黄豆磨成粉之后搅拌均匀加糖就好了!
糯米糍皮:
牛奶100G
椰浆100G
糯米粉120G
玉米淀粉30G
无盐黄油15G
糖50G

⚠️黄油放温水里面融化⚠️
除了黄油将所有材料倒进盆里!用手动打蛋器搅拌均匀到无颗粒的状态!

然后加入黄油,搅拌均匀!

倒进盘里盖上保鲜膜准备上锅中火蒸15分钟!

蒸好之后,拿根筷子把面糊弄开,里面没有白色的液体就代表你的面糊蒸好了!把面糊从盘子里面拿出来之后,放进干净的碗里,盖上保鲜膜之后室温冷却!不盖保鲜膜表皮会被风吹硬!

芒果切丁,我都会切大一点!这样咬下去才有芒果的口感和味道!

这里芒果口味的,我准备了椰蓉裹着外皮,花生馅的我就准备了花生口味的!

稍微一点温温就可以开始做啦,记得一定要带手套,不然粘的你整个手不要不要的!
稍微揉一下面糊,怕粘手套的可以拿保鲜膜包下,这样就不会粘的那么厉害!
揉好之后,我是直接拿一搓出来,没有称大概多重!我都是自己大概一下抓个大小,想要做的准确一点的亲们,可以先称下总重量,然后算下分几颗,面皮用保鲜膜包一下,怕干掉!

面皮用保鲜膜包一层,然后按扁,这样不容易粘手套,又方便!

放上芒果,然后收边,本来想给大家照我怎么收边的!但是手实在没空了!我大概就是四个角先捏起来然后慢慢从角落捏起来就好了!

扔进椰蓉,滚啊滚啊,裹好椰蓉之后,我都会拿在手心在按一下,确保椰蓉不会再掉一点下来!

花生的也是一样的做法,只是可能花生会难包一点,因为提起来的时候花生馅会不小心跑出来!所以花生的包法我是类似饺子那样,直接对折起来,从角落捏起来像个饺子形状,封好所有口之后搓圆就好了!

裹好花生粉,花生糯米糍就好啦👍

因为特殊原因不能吃芒果,所以心血来潮来个花生的,觉得花生的也很好吃,因为炒过的花生特别特别的香!家里有喜欢芒果的,有喜欢花生的,人人有份!😄


The End
这里我总共做了12个的量!想多做点的亲们直接按这个量加进去就好了!
切剩下的芒果丁,不要浪费,我直接都拿来做芒果西米露,好吃😋好吃!


吃货女王👑
June 23, 2018
The little chef is here
咋家小厨神来啦
吃货的日常
June 23, 2018
sharp
厉害