


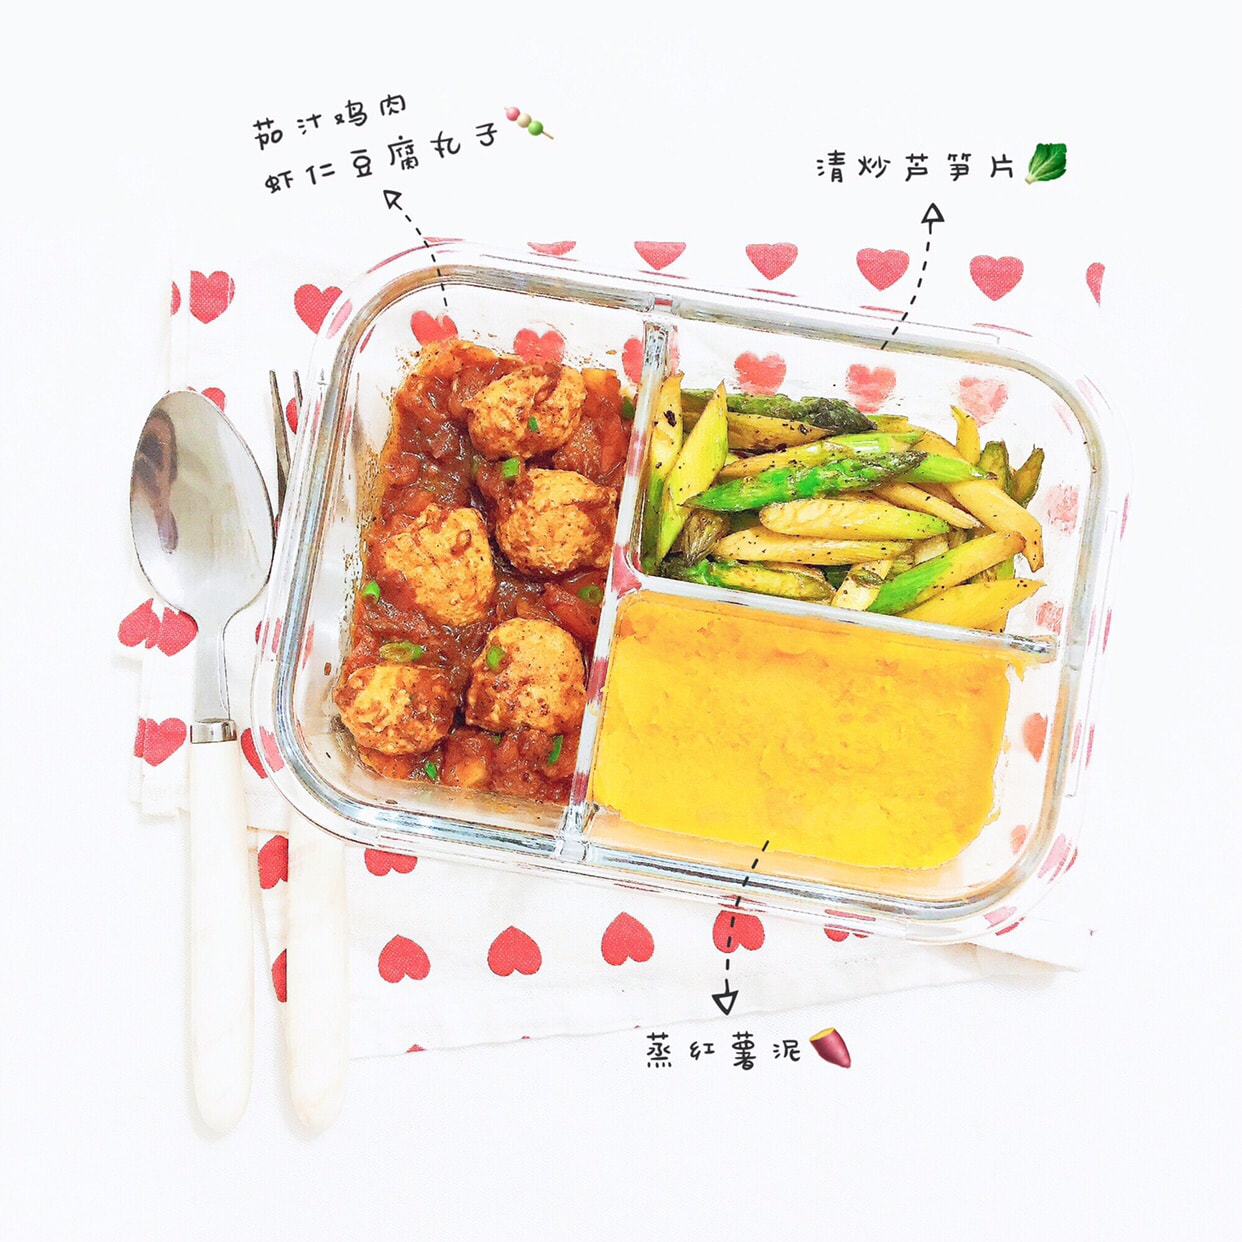
#New Year's refusal to take out takeout to cook and eat healthy🍝The next day✌🏻Check in#
Today's lunch box 🍱 and low-calorie delicious soy milk box 🤤
Chicken Shrimp Tofu Balls🍡I made it myself😬
The balls bought outside usually have a lot of additives, which are unhealthy and should be eaten less~
Using fresh tomatoes 🍅 instead of ketchup tastes great~
Sweet potatoes🍠Steamed and pressed into puree, no need to add extra sugar or anything
The taste of itself is very sweet, and eating more whole grains helps digestion!
Planting grass in soy milk box
Today I will teach you how to make this super delicious dessert 🍮
Let's prepare the ingredients for the chiffon cake first👇🏻
4 eggs 🥚
Corn oil 🌽40g
White sugar 🍬60g
52g low-gluten flour
Sugar-free soy milk 52g
*Soy milk can also be replaced with milk🥛*
Step 1: Separate the egg yolk protein into a water-free and oil-free basin, add milk🥛 and corn oil🌽 to the egg yolk and mix well, then sieve in the low-gluten flour and continue to mix evenly for later use.
Step 2: Beat the egg whites with an electric egg beater or a chef machine, add the white granulated sugar into the egg whites in three batches, and beat until moist and foamy. (Slightly lift the egg beater, and the egg whites are in a small hook state, so don’t over-whistle.
Step 3: Take 1/3 of the egg white paste into the egg yolk paste, and stir it evenly with a spatula. Be careful not to let it defoaming. Pour all the mixed paste back into the meringue paste, continue to stir evenly and pour it into the baking pan. Preheat the oven at 375 degrees Fahrenheit for 10 minutes. *Note ⚠️Oven temperature 🌡️Do not over bake, insert a toothpick into the cake body without any mucus, indicating that the cake is cooked.
Step 4: After the baked cake is taken out, tap the air to release the air, then spread a piece of oiled paper on the cake, turn it upside down, let it cool and cut into suitable small pieces for later use.
🍰After the cake part is ready, let's make the soy milk custard sauce👇🏻
3 egg yolks
45g white sugar
30g low-gluten flour
Corn starch 🌽10g
Sugar-free soy milk 300g
Whipped cream 150g
15g white sugar
Soy flour appropriate amount
Step 1: After separating the egg yolk, add white sugar and stir, then add noodles and continue to stir until there are no particles.
Step 2: Turn off the heat when the soy milk is about to boil in a small milk pot, and then slowly pour it into the egg yolk paste you just stirred. Stir while pouring❗️Otherwise, it will become egg yolk soup 😂 After stirring evenly, pour it back into the milk pot and keep stirring with egg whip until the soy milk starts to thicken and can be hung on the egg whip. Immediately turn off the heat, put it in a bowl, and stick the soy milk custard sauce with plastic wrap to prevent it from drying out. After cooling, place in the refrigerator to cool down.
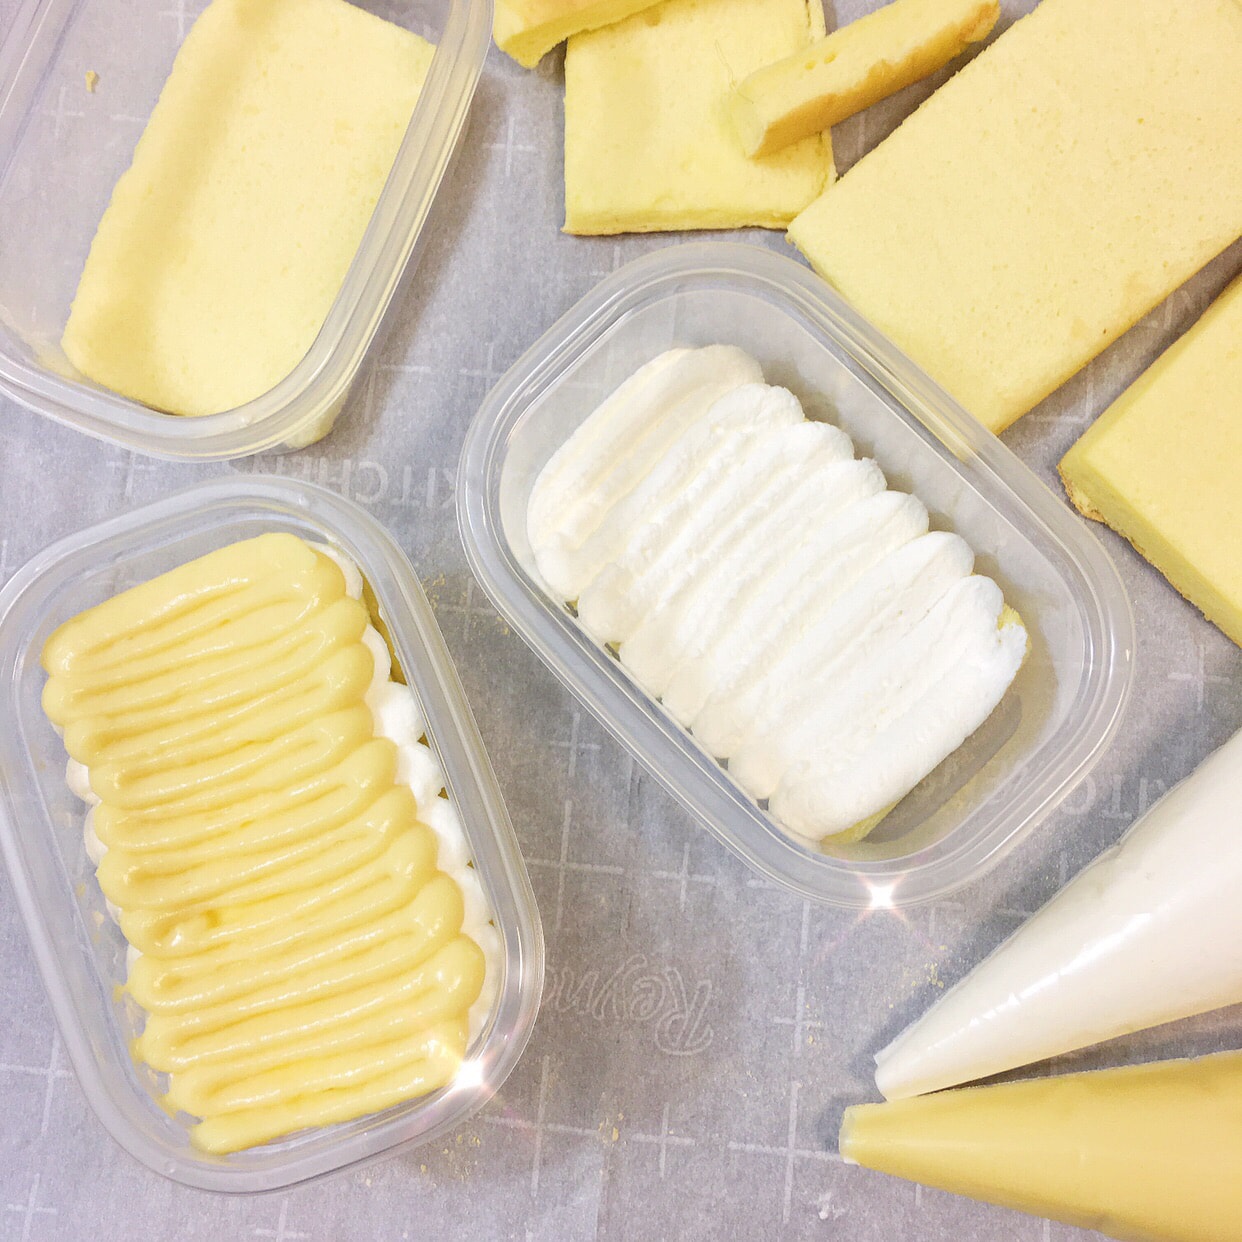
Step 3: Add the whipped cream and white sugar to the piping bag, and the soy milk custard sauce is also put into the piping bag.
After the above preparations are done, you can assemble the cake! 🤣
First put a layer of cake body, then a layer of cream, a layer of soy milk sauce, and then sieve into the soybean flour
Then add a layer of cake, a layer of cream, a layer of soy milk sauce, and finally sift in the soybean flour
Repeat this twice to complete the delicious soy milk box ✅✌🏻
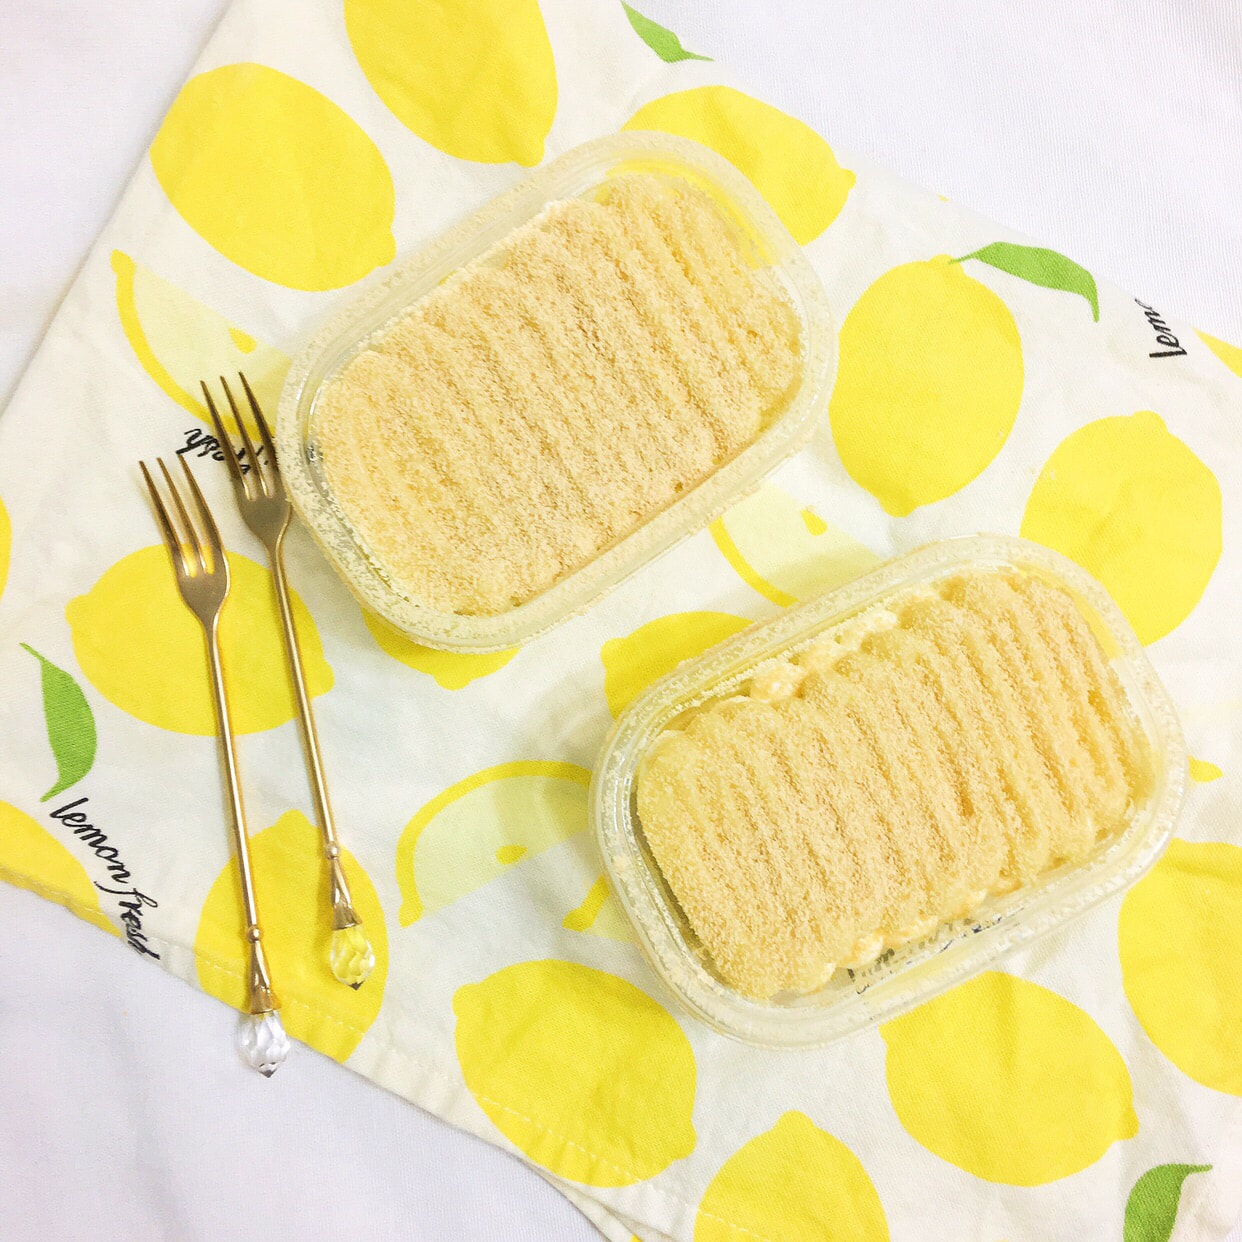
Friends, you must try to make this cake, it's really delicious 🤤
Soybean flour is very fragrant and rich in taste, and you can buy it on Yami!
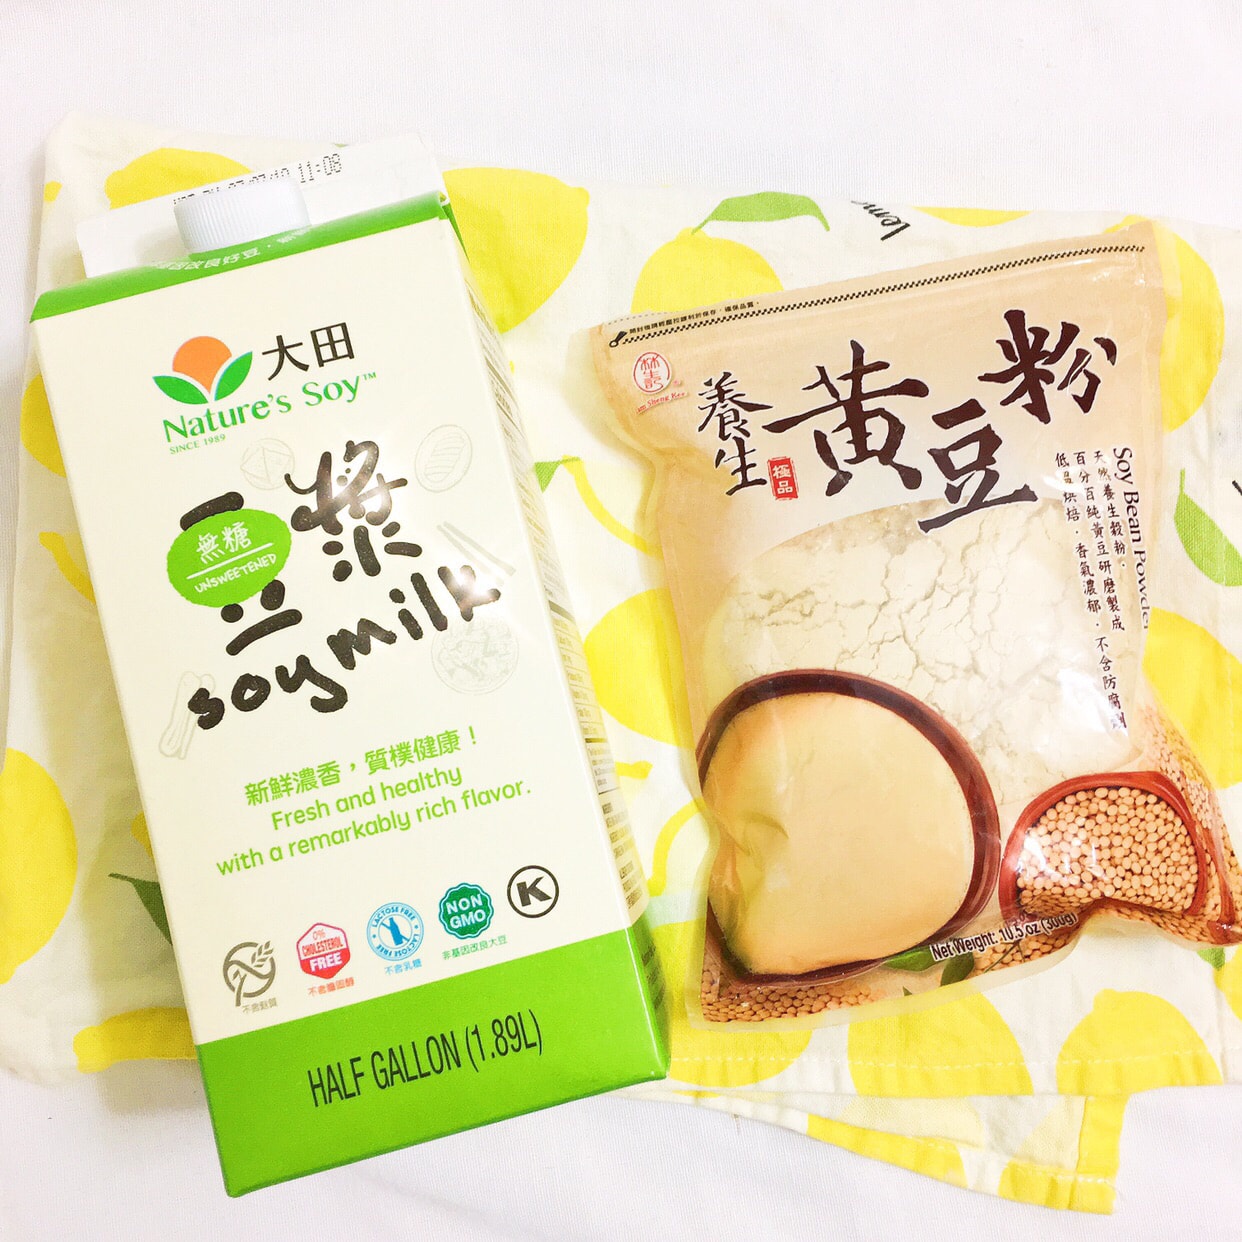
Some hard-working friends about soy milk can also make their own soy milk
I'm lazy and the sugar-free soy milk bought directly at Yachao doesn't affect the taste~
Hope you can all be successful! 💗


 Show Original
 #新年拒绝外卖自己做饭吃得健康🍝第二天✌🏻打卡#
今天的午餐便当🍱还有低卡美味的豆乳盒子🤤
鸡肉虾仁豆腐丸子🍡是自己做的😬
外面买来的丸子通常会有很多添加剂不健康要少吃~
用新鲜番茄🍅代替蕃茄酱味道也很赞的~
红薯🍠蒸熟压成泥状不需要额外加糖什么的
自身的味道就很甜了而且多吃粗粮帮助消化棒棒哒!
豆乳盒子种草🌿很久买了黄豆粉也一直没动手做~
今天教大家一起来做这个超好吃的小甜品🍮
我们先来准备戚风蛋糕所需要的食材👇🏻
鸡蛋🥚4颗
玉米油🌽40g
白砂糖🍬60g
低筋面粉52g
无糖豆浆52g
*豆浆也可以用牛奶🥛代替*
第一步: 把蛋黄蛋白分离在无水无油的盆里,在蛋黄里加入牛奶🥛和玉米油🌽混合均匀后,筛入低筋面粉继续搅拌均匀备用。
第二步:电动打蛋器或者厨师机打发蛋白,白砂糖分三次加入蛋白糊,直至打到湿性发泡。(轻轻提起打蛋器,蛋白呈现小弯钩状态即可不要过度打发。
第三步:取1/3蛋白糊放入蛋黄糊中,用刮刀翻拌均匀。注意⚠️翻版手法不要让它消泡哦。把翻拌好的糊糊全部倒回蛋白糊里,继续翻拌均匀就可以倒入烤盘里,烤箱预热375华氏度10分钟。*注意⚠️烤箱温度🌡️不要烤过头,用牙签插入蛋糕体没有沾上任何黏液说明蛋糕烤熟了。
第四步:烤好的蛋糕拿出来后轻敲出空气,再蛋糕上铺一张油纸然后倒扣过来放凉切成适合的小块备用。
🍰蛋糕部分准备好后我们来做豆乳卡仕达酱👇🏻
蛋黄3颗
白砂糖45g
低筋面粉30g
玉米淀粉🌽10g
无糖豆浆300g
淡奶油150g
白砂糖15g
黄豆粉 适量
第一步:分离出蛋黄后,加入白砂糖搅拌后再加入面类继续搅拌至无颗粒状。
第二步:小奶锅加热豆浆快沸腾时关火,然后慢慢的倒入刚才搅拌好的蛋黄糊里。一边倒一边搅拌❗️不然就会成蛋黄汤的😂搅拌均匀后全部倒回奶锅小火不停用蛋抽搅拌,直至豆浆开始浓稠可以挂在蛋抽上即可。立即关火放入碗里,用保鲜膜贴在豆浆卡仕达酱上避免变干。放凉后放入冰箱冷藏冷却备用。
第三步:淡奶油加入白砂糖打发装入裱花袋,豆乳卡仕达酱也是一样装进裱花袋里。
以上的准备工作做好后就可以组装蛋糕咯!🤣
先放一层蛋糕体再一层奶油一层豆乳酱再筛入黄豆粉
再以一层蛋糕一层奶油一层豆乳酱最后筛入黄豆粉
这样重复两次美味的豆乳盒子就完成啦✅✌🏻
小伙伴们一定要试试做这个蛋糕真的好吃的不得了🤤
黄豆粉非常香味道很浓郁Yami上就可以买的到!
关于豆浆的部分勤劳的小伙伴们也可以自己打豆浆
我比较偷懒直接在亚超买的无糖豆浆味道不影响的~
希望你们都可以成功哦笔芯!💗
#新年拒绝外卖自己做饭吃得健康🍝第二天✌🏻打卡#
今天的午餐便当🍱还有低卡美味的豆乳盒子🤤
鸡肉虾仁豆腐丸子🍡是自己做的😬
外面买来的丸子通常会有很多添加剂不健康要少吃~
用新鲜番茄🍅代替蕃茄酱味道也很赞的~
红薯🍠蒸熟压成泥状不需要额外加糖什么的
自身的味道就很甜了而且多吃粗粮帮助消化棒棒哒!
豆乳盒子种草🌿很久买了黄豆粉也一直没动手做~
今天教大家一起来做这个超好吃的小甜品🍮
我们先来准备戚风蛋糕所需要的食材👇🏻
鸡蛋🥚4颗
玉米油🌽40g
白砂糖🍬60g
低筋面粉52g
无糖豆浆52g
*豆浆也可以用牛奶🥛代替*
第一步: 把蛋黄蛋白分离在无水无油的盆里,在蛋黄里加入牛奶🥛和玉米油🌽混合均匀后,筛入低筋面粉继续搅拌均匀备用。
第二步:电动打蛋器或者厨师机打发蛋白,白砂糖分三次加入蛋白糊,直至打到湿性发泡。(轻轻提起打蛋器,蛋白呈现小弯钩状态即可不要过度打发。
第三步:取1/3蛋白糊放入蛋黄糊中,用刮刀翻拌均匀。注意⚠️翻版手法不要让它消泡哦。把翻拌好的糊糊全部倒回蛋白糊里,继续翻拌均匀就可以倒入烤盘里,烤箱预热375华氏度10分钟。*注意⚠️烤箱温度🌡️不要烤过头,用牙签插入蛋糕体没有沾上任何黏液说明蛋糕烤熟了。
第四步:烤好的蛋糕拿出来后轻敲出空气,再蛋糕上铺一张油纸然后倒扣过来放凉切成适合的小块备用。
🍰蛋糕部分准备好后我们来做豆乳卡仕达酱👇🏻
蛋黄3颗
白砂糖45g
低筋面粉30g
玉米淀粉🌽10g
无糖豆浆300g
淡奶油150g
白砂糖15g
黄豆粉 适量
第一步:分离出蛋黄后,加入白砂糖搅拌后再加入面类继续搅拌至无颗粒状。
第二步:小奶锅加热豆浆快沸腾时关火,然后慢慢的倒入刚才搅拌好的蛋黄糊里。一边倒一边搅拌❗️不然就会成蛋黄汤的😂搅拌均匀后全部倒回奶锅小火不停用蛋抽搅拌,直至豆浆开始浓稠可以挂在蛋抽上即可。立即关火放入碗里,用保鲜膜贴在豆浆卡仕达酱上避免变干。放凉后放入冰箱冷藏冷却备用。
第三步:淡奶油加入白砂糖打发装入裱花袋,豆乳卡仕达酱也是一样装进裱花袋里。
以上的准备工作做好后就可以组装蛋糕咯!🤣
先放一层蛋糕体再一层奶油一层豆乳酱再筛入黄豆粉
再以一层蛋糕一层奶油一层豆乳酱最后筛入黄豆粉
这样重复两次美味的豆乳盒子就完成啦✅✌🏻
小伙伴们一定要试试做这个蛋糕真的好吃的不得了🤤
黄豆粉非常香味道很浓郁Yami上就可以买的到!
关于豆浆的部分勤劳的小伙伴们也可以自己打豆浆
我比较偷懒直接在亚超买的无糖豆浆味道不影响的~
希望你们都可以成功哦笔芯!💗